
Hiya Crafty Friends,
This techniques is very effective, but also very easy to do
Technique: Version 1
- First cut two pieces of card (this can be a cereal box, rather than using your good card) the same size of the card you want to use emboss

2. Cut your aperture I have used a scallop die for this tutorial, but it can be any shape you like. Repeat again with the second card (try to line up the apertures). Set aside the circles that have been cut out for later.


3. Stick the matching layers together

4. Place the card you wish to emboss in the embossing folder

5. Then place your aperture card over the top, lining it up with the card inside the embossing folder. Place the second cutting mat on top and run through your machine

6. As you can see, this process has left a black space in the embossing

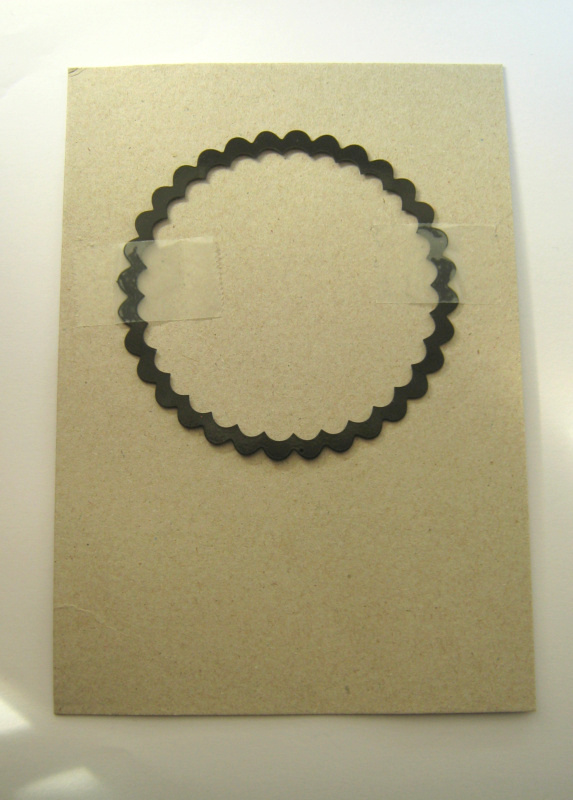
7. To finish off, line the die you used to cut the aperture card with the blank space and secure with low tack tape...

...turn card over...

...place your rubber/silicone mat on top, then the second cutting mat and run through your machine

8. Remove the die and the blank space is now framed

Technique: Version 2
1. Place the card you wish to emboss into the embossing folder. And place onto the first cutting mat

2. Place the shape you from the aperture on top and secure with tape, then place the second cutting mat on top and run through your machine.

3. Only that area will now have been embossed

4. Place the matching dies around the embossed are and secure with low tack tape

5. Use the same procedure used to create a frame on the first card.

Brillian.... thanks for sharing x
ReplyDeleteWhoops.... Brilliant x
ReplyDeletegreat idea's Debbie thank you for sharing.xxx
ReplyDeleteFab idea, love your step by step xxxxx
ReplyDeleteBliddy Nora wish I'd seen this before I forked out for the ranger plates :( x great tut xx
ReplyDeleteOh no!!! :(
DeleteFab Tutorial thank you for sharing. Chris xx
ReplyDeleteGreat techniques. Thanks for sharing.
ReplyDeleteFabulous tutorial Debbi, thank you for sharing hun xxx
ReplyDeleteGreat tutorial and thanks for sharing xx
ReplyDeleteFabulous Debbi, going to try this out today x keep up the good work x
ReplyDeleteThank you for the tutorials, brilliant techniques
ReplyDeleteI've shared it so everyone doesn't buy the plates ha ha xx
ReplyDeleteAwww, thank you hun. xx
DeleteThat's fabby I am gonna have to try this today xx
ReplyDeleteThank you for sharing your brilliant idea
ReplyDelete